Stovetop Smashed Potatoes | With Creamy Lemon-Dill Tahini Dipping Sauce

As a youngster in the 1980s – like most kids then and now – I’d base my opinion of a restaurant almost exclusively on the way in which the food was packaged, and of equal importance, on the swag that accompanied the meal. This meant that fast food chains ranked very high in my list of top dining establishments, namely McDonald’s with it Happy Meals (anyone remember those highly-coveted Muppet Babies figurines?) and Burger King with its 3 packs of mini hamburgers aka ‘Burger Bundles’, which for all their frivolity were likely the prequel to the now omnipresent ‘slider’. I don’t recall particularly enjoying the food at these places; I was sold on them for the toys and whimsically-presented meals alone.
Tahini1
Back then I hadn’t yet acquired an awareness of the marketing tactics of fast food chains, hell bent as they are on getting kids addicted to bad-for-you foods via an assortment of crafty ploys, from gimmicky packaging and tie-ins to the latest TV show or blockbuster movie, to on-site ‘play places’ where kids can work off their soda-induced sugar highs. The guile and cunning of these companies really is extraordinary; I wouldn’t be at all surprised to find out their marketing team include someone with a degree in child psychology – someone with the know-how to exploit the addictive potential of their young customers’ developing psyches!
Tahini2
Despite the cynicism I’ve acquired in adulthood about pretty much every aspect of fast food, I still recall with real fondness the experience of my parents taking me to eat at White Spot, a chain of burger joints exclusive to Western Canada. When I was little, White Spot earned my intense affection for its kids meal called the Pirate Pak, tantalizingly served in a cardboard schooner, complete with a sail impaled on a straw and best of all, a gold foil covered chocolate dubloon. Sure, the Pirate Pak was White Spot’s own little ruse to entice children to eat at their restaurants, but you have to admit it’s a pretty cool concept, and refreshingly void of any sort of corporate tie-in.
Tahini3
While in recent years White Spot has ditched its soda jerk vibe and morphed into a somewhat generic family restaurant, I still eat there regularly – if not for the atmosphere then for the delicious provolone-portobello veggie burger and cheap pints of Nat Bailey Pale Ale. Their brunches are also the best in town (I even requested to be taken their this past Mother’s Day). The smashed potatoes in this post (which are basically potatoes which have been boiled, flattened slightly, then pan-fried until crispy in a skillet) are my attempt to emulate the ones that are served alongside practically every item on the White Spot brunch menu.
Tahini4
While they’re great as a side dish for breakfast or brunch – I think they’d go particularly well with a frittata or omelette – the creamy lemon-dill tahini sauce I made to accompany them makes them a perfect appetizer or snack, too. Typically the thought of pairing something pan-friend with something creamy strikes me as a bit much – but here there’s not that much to feel guilty about, as the potatoes are fried using minimal oil, and the sauce’s creaminess comes from a blend of tahini and egg-free mayo. OK, it’s still not the saintliest of recipes, but I guarantee it’s better for you than a Happy Meal 🙂
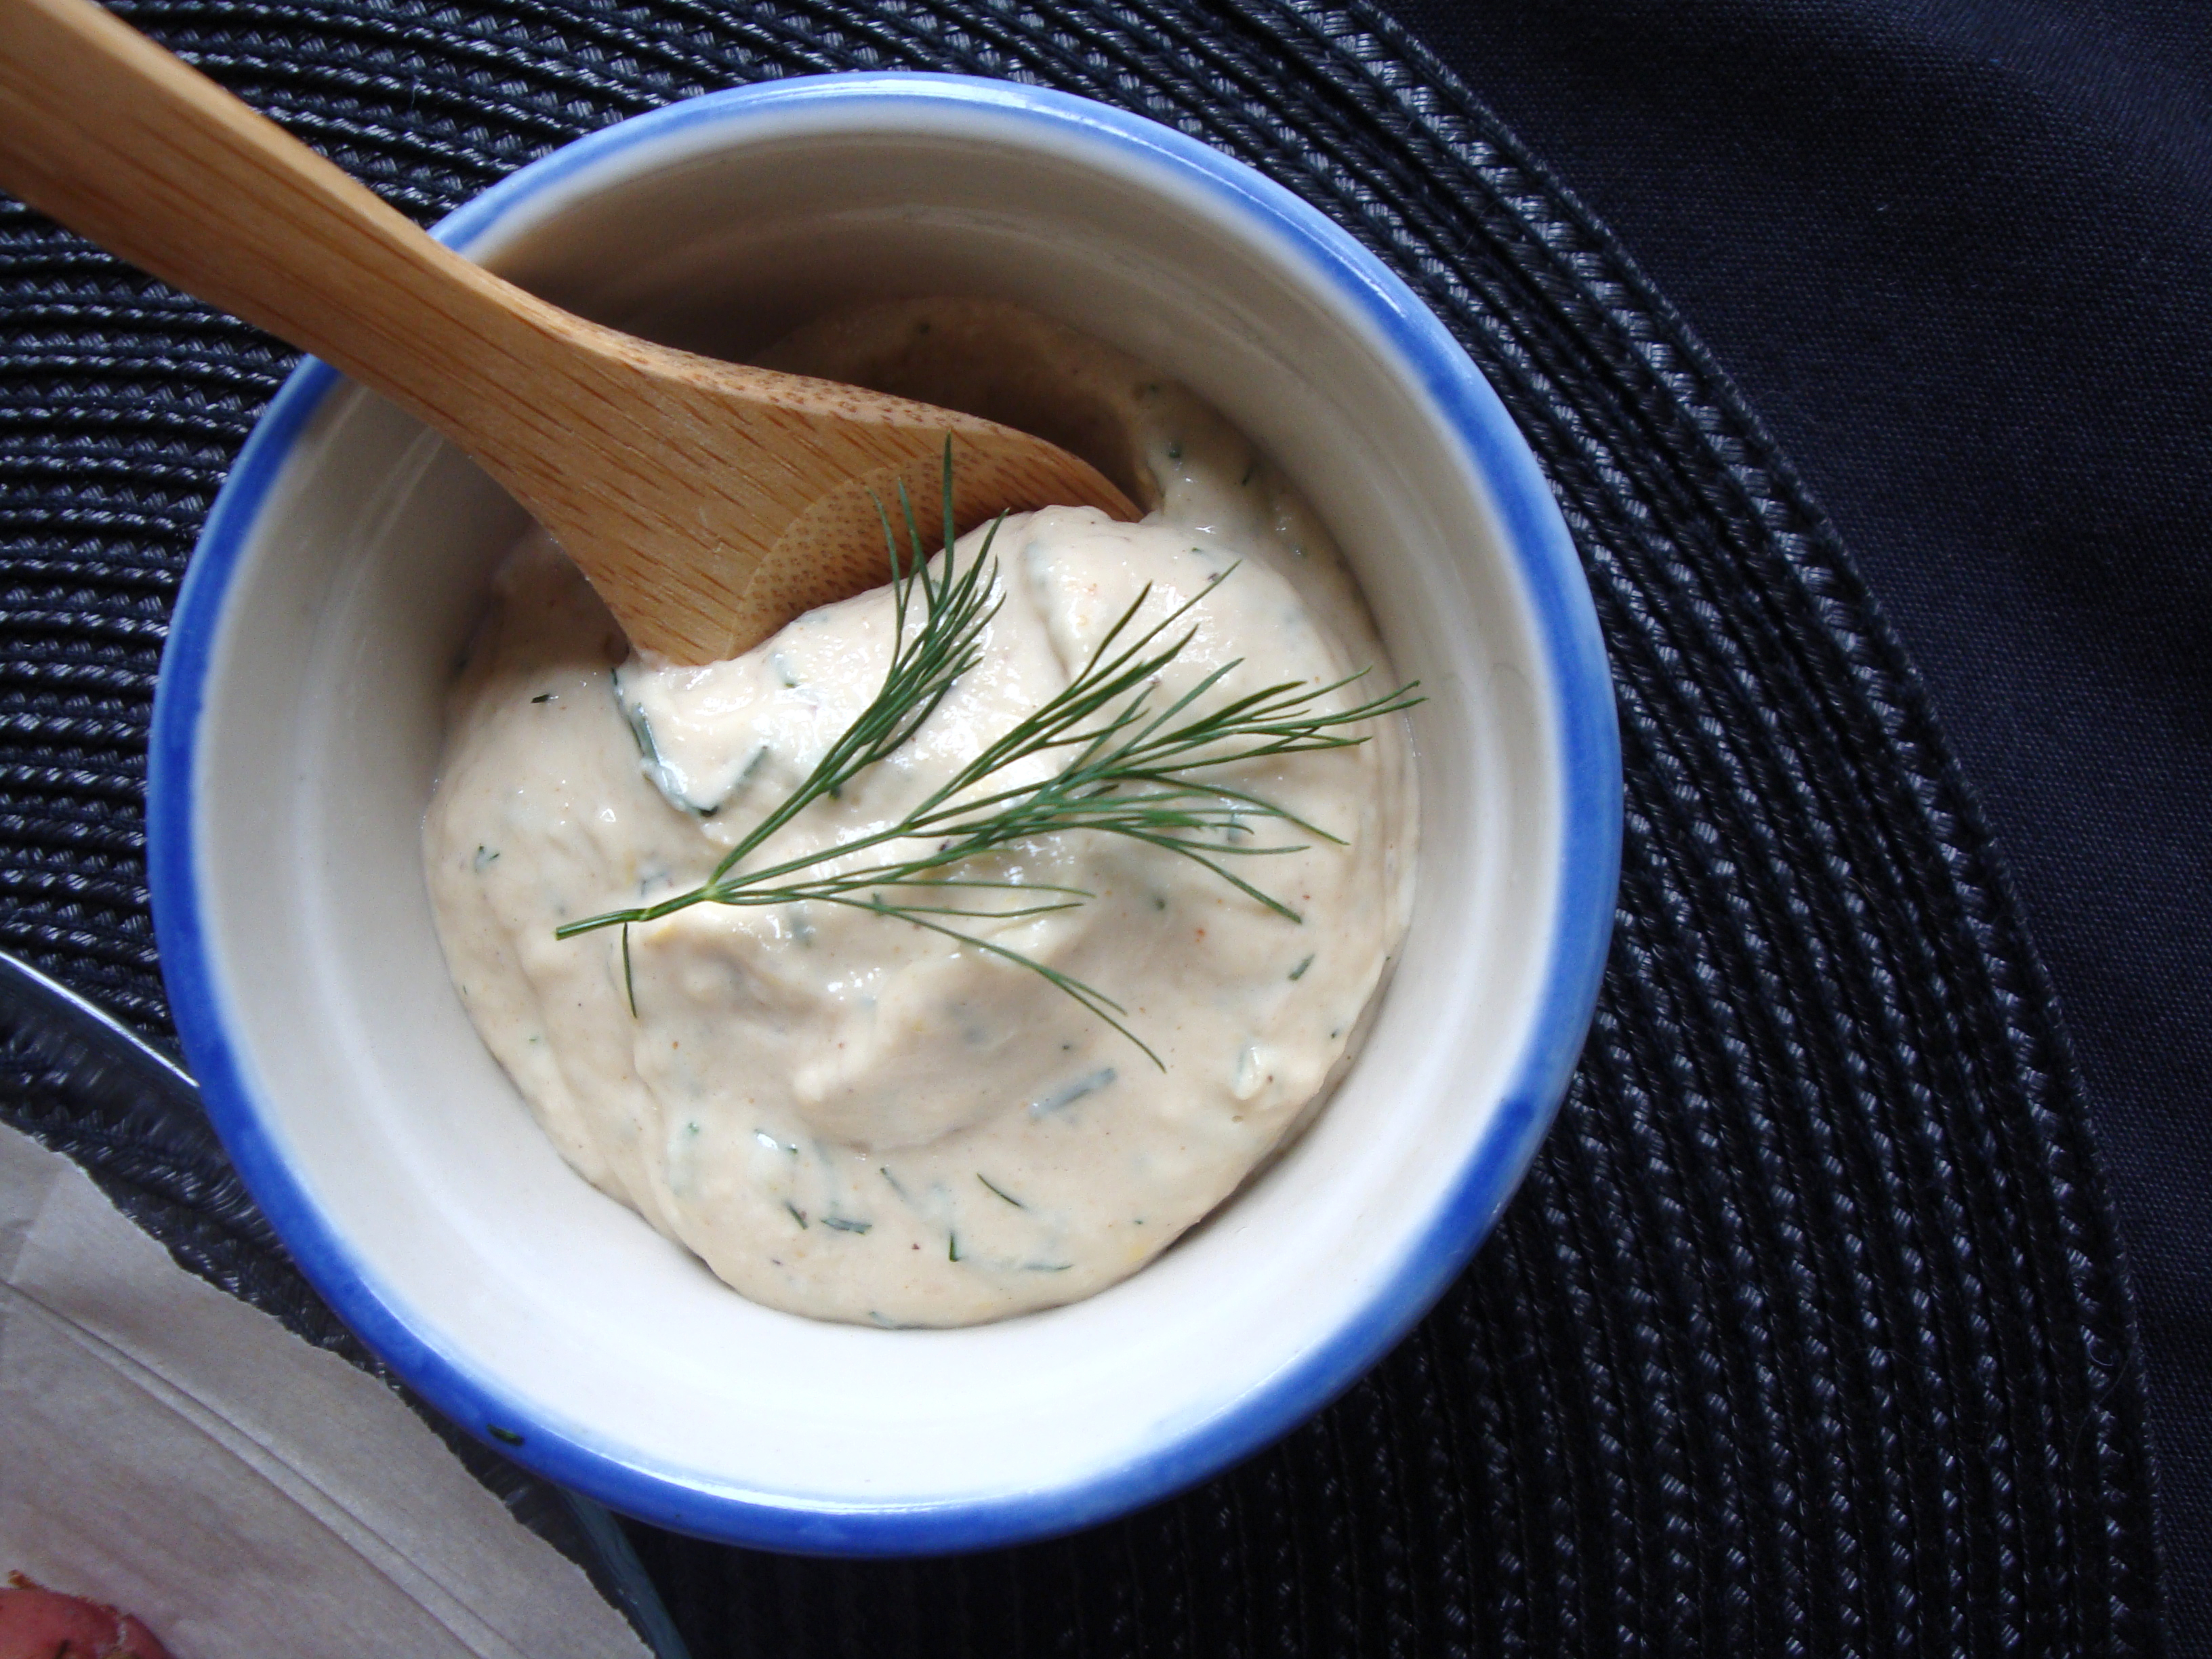
Recipe: Stovetop Smashed Potatoes | With Creamy Lemon-Dill Tahini Dipping Sauce
Ingredients:
Stovetop Smashed Potatoes
  • 16 red potatoes, scrubbed clean (choose potatoes that are no larger than 2″ in diameter)
  • 1 tablespoon extra virgin olive oil
  • Salt and freshly ground black pepper

Creamy Lemon-Dill Tahini Sauce

  • 1 medium garlic bulb
  • 1 tablespoon extra virgin olive oil
  • Zest and juice of 1 medium lemon
  • 1/4 cup tahini
  • 1/4 cup + 2 tablespoons vegan mayonnaise
  • 1 tablespoon minced fresh dill
  • Salt and freshly ground black pepper

Method:

Prepare potatoes

  1. Place potatoes in a large stock pot and cover with water.
  2. Bring pot to a boil, then reduce to a simmer.
  3. Let potatoes cook until tender all the way through, about 15-20 minutes.
  4. Drain and set aside to cool.

Roast garlic for sauce

  1. While potatoes are cooking, preheat oven to 425F.
  2. Peel outmost layers of skin from garlic bulb.
  3. Place garlic on an approx. 6″ x 6″ piece of aluminum foil and drizzle with 1 tablespoon of olive oil. Season lightly with salt and pepper.
  4. Bundle aluminum foil tightly around garlic.
  5. Place in oven and roast until garlic cloves are soft, about 30 minutes.
  6. Remove from oven and set aside to cool.

Finish sauce

  1. Once garlic has cooled enough to handle, carefully remove skin from each clove (the clove should separate easily from the skin).
  2. Place garlic cloves in food processor along with tahini, vegan mayonaise, lemon zest and juice.
  3. Blend everything until completely smooth.
  4. Taste mixture and season to taste with salt and pepper.
  5. Transfer mixture to small bowl and stir in minced dill.
  6. Cover and store in fridge until needed.

Finish potatoes

  1. Once potatoes are cool enough to handle, flatten each one slightly. Do this by holding potato between your index finger and thumb of one hand and pressingly down gently with the heel of your other hand. Don’t press too hard or your potato will fall apart!
  2. After flattening each potato, heat one tablespoon of olive oil in a large skillet over medium heat.
  3. Once oil is hot, transfer your flattened potatoes to the skillet. Season lightly with salt and pepper.
  4. Pan fry potatoes until crispy, about 3-4 minutes on each side.
  5. Remove from heat and serve, topping each portion with a dollop or two of Creamy Lemon-Dill Tahini Sauce. Eat!

You might also like:

Crispy Baked Polenta Wedges | With Fresh Cut Strawberry, Cucumber and Lime Salsa

Parents make a fairly accurate claim when they say that having a kid is one of the hardest things you’ll ever do. I’m not even talking about the pushing-the-baby-0ut part – although I still stand by my assertion that being in labour feels (in my experience) like being hit repeatedly in the abdomen (and back) with a sledge hammer. The real work comes with figuring out just how to handle the darned thing once he or she pops out as a fully-formed infant.
Salsa1
I used to roll eyes derisively behind my Ray-Bans when a parent would bemoan to me their toddler-induced exhaustion. But now that I have a toddler of my own I know only too well what they’re talking about: the non-stop night nursing, the refusal to eat certain foods (and the subsequent hurtling of said foods across the room or in the direction of the dog), the panic-inducing (for me) thrill seeking (my little guy loves to scale to the highest heights unassisted), the obsessive manhandling of only the filthiest household items (plunger and toilet brush), the seemingly unprovoked, back-arching tantrums. I could go on and on. I love the little sucker to bits and am growing more obsessed by the day – I even look at pictures of him on my phone while he’s napping – but HOLY COW does he put me through the paces at every conceivable moment!
Salsa2
At a certain point one gets to thinking about taking a bit of a vacay, especially on days like today when the dog woke you up at 2am in the throes of diarrhea. Oh wait, except as a parent of a young child a true vacation – one where you can kick back with your oversized cocktail of choice and not have to worry about the proximity of your kid to the pool, and other potentially life-threatening considerations – isn’t really an option. Neither is leaving him with the in-laws, because as burned out as I feel at times the thought of not being around him for even a few days puts a very large and sappy tear in my eye. At any rate, we’ve decided to attend a friend’s wedding in Puerto Vallarta – although it’s not until November and I’m sure I’ll spend 99 percent of my time there chasing the little guy around with a tube of sun screen and worrying about the possibility of shark attacks, kidnappings and other statistically improbably occurrences. Being a parent has transformed me into the ultimate worry wart!
Salsa3
While our sojourn to Mexico is still 6 months away (will I still be sane by then?), as soon as I was finished booking our seats with the travel agent my mind reverted to its favourite topic: food. And in this instance, Mexican food. My favourite item of Mexican cuisine, apart from a big old Mission-style burrito cram packed with fresh veggies, is also the most simple: fresh cut salsa paired with crispy tortilla chips (and an ice cold bottle of Sol, of course).
Salsa4
Fresh cut salsa typifies the notion that food doesn’t have to be complicated to be delicious. I love how the ripe tomatoes, cilantro, the mild bite of sweet onion and fresh lime juice come together and form something so bright and balanced on my taste buds. The salsa in this post deviates from the traditional by replacing tomatoes with strawberries, whose juicy sweetness is tempered perfectly by lime juice, minced shallot and jalapeno. It tastes great with tortilla chips (of course) or tossed into a green salad, but here I’ve made it into a nice light lunch and served it over baked polenta wedges – golden and crispy on the outside; warm and tender of the inside. Our vacation is still merely a dot on the horizon, but dishes such a this will do a decent job of tiding me over 🙂
Recipe: Crispy Baked Polenta Wedges | With Fresh Cut Strawberry, Cucumber and Lime Salsa
Serves 3-4
Ingredients:
Baked Polenta Wedges
  • 1/2 cup cornmeal
  • 2 1/2 cups unsweetened almond milk)
  • 1 tablespoon vegan margarine
  • 1/4 cup nutritional yeast or vegan parmesan
  • Salt and freshly ground black pepper
  • 1 tablespoon or so of extra virgin olive oil
Strawberry, Cucumber and Lime Salsa
  • 1/2 cup cucumber, skin and seeds removed and diced small
  • 1/2 cup strawberries, diced small
  • 1/2 cup loosely packed chopped cilantro
  • 1/2 jalapeno pepper, seeds removed and diced small
  • 1 small shallot, minced
  • 1 medium lime, juiced
  • 1/4 teaspoon salt

Method:

Prepare Salsa

  1. Place lime juice and salt in a medium bowl and whisk to combine.
  2. Add cucumber, strawberries, cilantro, jalapeno and shallot to bowl and gently toss until everything is combined.
  3. Cover bowl and place in refrigerator until needed.

Prepare Baked Polenta Wedges

  1. Lightly grease an 8×8 pan with olive oil and set aside.
  2. Place almond milk in a medium saucepan and bring to a gentle simmer.
  3. Whisk in cornmeal then switch to a spoon as mixture thickens. Stir until liquid is fully absorbed.
  4. Remove from heat and stir in margarine and nutritional yeast (or parmesan), and a bit of salt and pepper.
  5. Immediately transfer polenta to prepared pan and smooth top with a wet spatula.
  6. Place in refrigerator for 45 minutes, or until firm.
  7. While polenta is in fridge lightly grease a baking sheet with olive oil.
  8. Once polenta is firm, remove from fridge and preheat oven to 375F.
  9. Flip polenta onto a cutting board and cut into wedges.
  10. Transfer polenta wedges onto prepared baking sheet and brush tops with a bit of olive oil.
  11. Place in oven for 45 minutes or until tops are crispy and golden brown.

Assemble

  • Transfer polenta wedges to serving plates and top each portion with a few scoops of salsa. Eat!

You might also like:

Quinoa and Roasted Cherry Tomato Salad | With Lemon Vinaigrette and Toasted Sunflower Seeds

For those of you who participated in Virtual Vegan Potluck this past Saturday, I hope you enjoyed it as much as I did. The scope of recipes that was brought to the table was remarkable, as was the care and expertise with which each dish was presented. I was really inspired by how creative – and in many cases, outright gourmet – the dishes were, flying in the face of any negative stereotype of ‘vegan potluck food’ one might hold. Vegan bloggers are clearly a talented lot! If you’re interested in checking out the potluck from the beginning, you can do so here.

Cherry1

I also was super impressed by how smoothly the potlcuk came together – although I’m sure Annie at An Unrefined Vegan and Somer at Vedged Out, who coordinate the event, would disagree; just a guess, but rounding up 160+ bloggers from around the world and figuring out the logistics of getting them to post in unison must be a bit of migraine headache. I admire her dedication to making the whole thing happen!

Cherry2

My sweet tooth was given full expression with the Salted Triple Chocolate Brownies I made for the potluck. Maybe the best thing about vegan baking is that you can sneak spoonfuls of the batter without risking salmonella poisoning, something I fully took advantage of while I was making my brownies. By the time I’d finished photographing and then sampling the final product, I felt like I’d definitely reached my sugar quota for the week, maybe even the month! Whenever that happens – and it certainly wasn’t the first time – I feel the need to ‘undo the damage’ wrought by the demonic baked good in question via a super healthy concoction of some sort.

Cherry3

… Which is where this salad comes into the picture. Being a quinoa salad, it’s inherently nutritious – but with the bold flavours of marinated artichoke hearts, sweet balsamic-roasted cherry tomatoes, fresh basil, lemon zest and crunchy radishes and toasted sunflower seeds, it’s anything but rabbit food! It makes a satisfying lunch on its own, and is also great as a side dish – but maybe the best way to enjoy this salad – and I only discovered this with the leftovers – is to bundle it up in a wrap and eat it that way. I guess I shouldn’t be surprised – bread of any description always takes things to the next level!

Cherry4

Recipe: Quinoa and Roasted Cherry Tomato Salad | With Lemon Vinaigrette and Toasted Sunflower Seeds

Makes 4-6 servings

Ingredients:

For the dressing

  • 1/4 cup extra virgin olive oil
  • Juice of 1 medium lemon (zest your lemon first and set the zest aside; you’ll need it for the salad)
  • Pinch of red pepper flakes
  • 1/4 teaspoon coriander
  • 1/4 teaspoon salt

For the salad

  • 1 cup uncooked quinoa, rinsed
  • 25 cherry tomatoes
  • 1 tablespoon of extra virgin olive oil
  • 1 tablespoon balsamic vinegar
  • Zest of 1 medium lemon
  • 6 medium basil leaves, chiffonaded
  • 1 small shallot, minced
  • 1/2 cup chopped marinated artichoke hearts
  • 4 radishes, finely sliced
  • 1/4 cup plain sunflower seeds
  • Salt and freshly ground black pepper

Method:

Roast cherry Tomatoes

  1. Preheat oven to 400F.
  2. Place tomatoes on a baking sheet and drizzle with 1 tablespoon of olive oil and 1 tablespoon of balsamic vinegar
  3. Season lightly with salt and pepper.
  4. Place in oven for 20 minutes or until tomatoes are soft and collapsed (tomatoes will leak a lot of juice while roasting – it’s OK)
  5. Rem0ve from oven and set aside to cool.

Cook quinoa

  1. While tomatoes are roasting, combine rinsed quinoa and 1 1/2 cups of water in a medium saucepan.
  2. Cover and bring to a boil.
  3. Reduce heat to low and let quinoa cook for 15 minutes.
  4. Remove from heat, fluff with a fork and set aside to cool.

Prepare Lemon Vinaigrette

  1. Combine olive oil, lemon juice, red pepper flakes, coriander and salt in a small bowl and whisk everything until thoroughly combined. 
  2. Set aside until needed.

Toast Sunflower Seeds

  1. Place sunflower seeds in a small skillet over medium heat.
  2. Tossing continuously, toast seeds until just golden brown (this will only take a couple minutes – be careful, they burn easily!).
  3. Remove from heat and set aside to cool.

Assemble Salad

  1. Place cooled quinoa, shallots, artichokes, radishes, basil, lemon zest and toasted sunflower seeds in a large salad bowl and toss to combine.
  2. Gently fold in roasted tomatoes and juices from roasting pan.
  3. Drizzle lemon vinaigrette into bowl toss until everything is combined.
  4. Serve, topping each portion with freshly ground black pepper. Eat!

You might also like:

Welcome to Virtual Vegan Potluck! | Salted Triple Chocolate Rhubarb Brownies

vvpLOGO

Welcome to the May 2013 edition of Virtual Vegan Potluck! This is my first time participating in the potluck and I’m pretty stoked to be joining forces with 168 other bloggers to create the ULTIMATE vegan three course meal! If you don’t know what the heck I’m talking about, click on the icon above and find out more. Just don’t forget to come back!

Brownie1

Hi again. If you’ve followed the potluck from the start, excellent work. Your virtual stomach must be getting full, but I hope you have a bit of room left for another dessert! Those of you who read my blog regularly already know I have a crazy sweet tooth, and have been known to go a little overboard in the bulk candy aisle at the grocery store from time to time. While I’ve been trying to scale back my sugar consumption recently, I figured it would be OK to make an exception – this being my Virtual Vegan Potluck and all. So in honour of the occasion I whipped up a batch of these moist, uber decadent Salted Triple Chocolate Rhubarb Brownies!

Brownie3

At this point some of you might be thinking only a crazy person would combine chocolate and rhubarb. But don’t call the asylum quite yet! Somehow the tangy punch of rhubarb marries blissfully with the richness of dark chocolate – and despite the 50 percent divorce rate, this couple is together for the long term. Ok, that was a super corny… just believe me, it’s a flavour combination that works. Rhubarb is coming into season in this part of the world, and whether you’re fan of it or not, I can almost guarantee you’ll love these brownies! As an added bonus they’re a one-bowl affair, so you can have a clean kitchen and eat your brownies, too. And oh yeah, they taste even better the next day (if they last that long).

Brownie4

If you haven’t done so already, be sure to visit the dessert preceding mine in the potluck at The Soulicious Life. And definitely head on over to the next dessert in the lineup at Lucy’s Friendly Foods. Finally, props to Vegan Bloggers Unite for hosting the potluck! See you all next time… 🙂

Recipe: Salted Triple Chocolate Rhubarb Brownies

Ingredients:

For the brownies (batter adapted from Two Peas & Their Pod)

  • 1 1/2 cups granulated cane sugar
  • 2 cups all purpose flour
  • 1/2 cup coconut oil, melted
  • 1 1/4 cups unsweetened apple sauce
  • 2 teaspoons vanilla extract
  • 1/3 cup cocoa powder
  • 1 teaspoon salt
  • 1 1/2 teaspoons baking soda
  • 1 cup rhubarb, diced small
  • 1/3 cup dairy-free dark chocolate, chopped into pea-sized chunks

For the icing

  • 1/2 cup vegan margarine
  • 2 teaspoons pure vanilla extract
  • 2 cups powdered sugar
  • 1/4 cup cocoa powder
  • 1/2 teaspoon sea salt (plus a bit more for garnish)
  • 2 teaspoons almond milk

Method:

Prepare Brownies

  1. Preheat oven to 350F. Grease an 8 x 11 pan and set aside.
  2. In a large bowl mix together flour, sugar, coconut oil, apple sauce and vanilla.
  3. Add cocoa powder, salt and baking powder and mix on low just until everything is combined.
  4. Gently fold in rhubarb and chocolate chunks.
  5. Pour batter into prepared pan and bake for 25-30 minutes, or until toothpick comes out clean.
  6. Remove from oven and set aside to cool on a wire rack.

Prepare Frosting

  1. In the same bowl you used for the batter (or use a clean one – just trying to save you some work) cream together margarine and vanilla.
  2. Blend in cocoa powder and salt.
  3. Blend in powdered sugar one cup at a time, beating well after each addition.
  4. Beat in almond milk and continue beating until frosting is light and fluffy. [If you find the frosting too dry, add a bit more almond milk. If it’s too soft, add more powdered sugar].
  5. Cover and set aside until you’re ready to frost brownies.

Finish

  1. Using a frosting knife or spatula, frost top of brownies.
  2. Sprinkle a bit of sea salt on top of frosting.
  3. Cut into squares and serve. Eat!

go_forward-300x243

go_bck-300x257

Spaghetti and {Vegan} Meatballs! | With Spicy Tomato Sauce

I’ve admitted here before that for most of my life I’ve had a rather self-righteous disdain for the suburbs. When I lived downtown, before I had a baby, an unflattering stereotype of the suburbs existed in my brain: subdivision upon sprawling subdivision, bumper to bumper mini vans, Lulu Lemon-clad soccer moms with the carefully cultivated Kate Gosselin hairdos. It was the Big Box stores that bothered me the most, you know the ones – the Home Depots, the Bed Bath and Beyonds, the Best Buys, the chain restaurants. All suburbs seem homogenous in this regard – compare one around where I live to one in Ontario or to one in the American Midwest and you’ll likely see a nearly identical cross section of venues to spend your money.

Meatballs1

Despite the anti-suburbanite rancour of my pre-baby self, I’m now a suburban dweller – albeit a reluctant one. Now that I live here, most like for the long run, I’m trying to adopt what could be described in a when in Rome attitude toward the Big Box attractions in my neighbourhood. I’m not going anywhere, and neither are they, so we might as well try to get along, right? To this end, we dined at Olive Garden – the only one in BC, quite the distinction – last weekend. It’s situated in a strip mall, of course!

Meatballs2

When you eat at Olive Garden you don’t just get a meal – you get an experience. I’m talking hovering hordes of psychotically charismatic servers, basketfuls of free bread sticks, free wine samples, and bottomless soup and salad. Crazy! There was so much food, drink and general mirth being thrust in our direction as soon that I could hardly focus on making a selection from the menu. And the place was fully bumping –  we had to wait 45 minutes for a table; every inch of the restaurant’s thousands of square feet was packed with diners munching their way to Tuscan-style chain restaurant heaven. I ended up ordering a porcini mushroom ravioli, which was surprisingly delicious and far from the bland, coagulated muck I expected it to be. For dessert, a large slab of Tiramisu – also tasty!

Meatballs3

The food did have a mass-produced air about it, but as far as chain restaurants go – and apart from the boring bottomless salad, which was 90% iceberg lettuce – it was decent. I never thought a place like the Olive Garden would prompt me to break out of my pasta comfort zone and start experimenting in the kitchen, but it did. Not that I went home and started churning out my own fresh pasta noodles like an Italian nona, but I did whip up these vegan meatballs in an attempt to jazz up my spaghetti. I started with mashed cannellini beans and multigrain bread crumbs, and added in sauteed leeks, garlic, mushrooms, green onions and a flax egg. I then rolled them into balls and browned them in a skillet, then tossed them with spaghetti and a spicy tomato sauce. They turned out great! I don’t think you’ll see anything like this on the menu at Olive Garden any time soon, but it did get an enthusiastic thumbs-up from the household omnivore 🙂

Hey, Virtual Vegan Potluck is coming up on May 11! Are any of you participating? If so, what type of dish are you bringing? I’m bringing a dessert and am VERY excited about my recipe!

Meatballs4

Recipe: Spaghetti and {Vegan} Meatballs | With Spicy Tomato Sauce

Makes 4 servings

Ingredients:

  • About 200g spaghetti pasta (use gluten free pasta if you’re gluten sensitive)

Meatballs

  • 4 tablespoons of extra virgin olive oil, divided
  • 1 medium leek (white and light green parts only), minced
  • 2 large garlic cloves, minced
  • Pinch of red pepper flakes
  • 1/2 teaspoon paprika
  • 1/2 teaspoon ground coriander
  • 8 white or brown mushrooms, chopped into pea-sized pieces
  • 3 green onions (dark and light green parts only), minced
  • 2 pieces of whole grain bread, processed into crumbs (use gluten free bread if you’re gluten sensitive)
  • 398ml can of cannellini beans, drained and rinsed
  • 1 flax egg (I used Bonzai Aphrodite’s flax egg recipe)
  • Salt and freshly ground black pepper

Tomato Sauce

  • 2 tablespoons of extra virgin olive oil
  • 3 large gloves of garlic, minced
  • 1/4 teaspoon of red pepper flakes
  • 1/4 teaspoon ground dried thyme
  • 1/4 teaspoon ground dried oregano
  • 796ml can of good quality diced tomatoes
  • 1 tablespoon of brown sugar, firmly packed
  • 1 tablespoon of good quality balsamic vinegar
  • Salt and freshly ground black pepper

Method:

Prepare vegan meatballs

Makes 25-30 meatballs

  1. Prepare flax egg according to this recipe – this needs to be done 1 hour in advance.
  2. Place drained cannellini beans in a large bowl and mash using a fork or potato masher. Set aside until needed.
  3. Heat 2 tablespoons of extra virgin olive oil in a medium skillet over medium heat.
  4. Add leeks and saute until tender.
  5. Add garlic and saute just until golden brown.
  6. Add red pepper flakes, paprika and coriander and stir until spices coat other ingredients.
  7. Add mushrooms. Season lightly with salt and pepper.
  8. Cover skillet and let mushrooms reduce, stirring periodically.
  9. Fold in green onions.
  10. Remove from heat and transfer contents of skillet to your bowl with mashed cannellini beans.
  11. Add flax egg and bread crumbs and season lightly with salt and pepper.
  12. Stir until everything is well combined. I started with a wooden spoon then used my hands once mixture was cool enough.
  13. Using a 1 tablespoon scoop, roll mixture into balls and place on a plate. Tip: Keep your hands damp to prevent mixture from sticking.
  14. Place in fridge for 45-60 minutes to chill.
  15. Next you’ll brown your meatballs (do this in two batches to make it more manageable). Heat 1 tablespoon of olive oil in a medium skillet over medium heat.
  16. Once oil is hot, add half of meatballs to skillet.
  17. Using a wooden spoon, keep meatballs moving until each side is golden brown.
  18. Repeat steps 13-15 with second half of meatballs.
  19. Keep meatballs warm in oven until ready to serve.

Prepare Spicy Tomato Sauce (this can be done while meatballs are firming in the fridge)

  1. In a large skillet, heat 2 tablespoons of olive oil over medium heat.
  2. Add garlic and saute just until golden brown.
  3. Add red pepper flakes, oregano and thyme and stir until spices coat garlic.
  4. Add diced tomatos and bring to a gentle boil.
  5. Reduce heat to low and let simmer for 15 minutes, stirring occasionally.
  6. Using an immersion blender, puree sauce until mostly smooth (I like to leave a few tomato chunks). You can also use a conventional blender, then return sauce to skillet.
  7. Taste and season with salt and pepper.
  8. Keep simmering sauce on low until ready to serve. Add a little water if sauce becomes too thick.

Prepare Pasta

  1. Cook pasta according to package instructions, or until al dente.
  2. Drain and rinse under cold water.

Finish

  1. Transfer cooked pasta to skillet containing tomato sauce and toss to combine.
  2. Serve, topping each portion with meatballs and freshly ground black pepper.
  3. Eat!

You might also like:

April Foodie Penpals Reveal!

FPP-post

For months now I’ve been experiencing Foodie Penpals vicariously through a few of the blogs I follow. On each reveal day I’d read keenly through posts detailing the tasty foodstuffs participants had received from their penpals, and would be itching to get in on the action. Finally I decided to quit observing from the sidelines and sign up for the program!

If you’re not already aware, basically how Food Penpals works is as follows: You’re paired up with two people. One of these people you send a package of foodie things (snacks, treats, etc.) to, and the other you receive a package from. Then on the last day of the month you publish a blog post describing the contents of the box you received. Good times, right? For a detailed description of the program, or to sign up, just click on the icon above.

Both of the people I was paired up with this month hail from Toronto. I sent a package to Katie, a teacher working her way toward an MA in Education (whoa!), and I received a package from Allie. Allie is a woman of many talents! She authors the The Crooked Apartment, an eclectic blog full of her reflections on daily life, music recommendations, and recipe and decor inspiration. She’s an avid runner and writes about that topic as well. It’s always an interesting read, so be sure to check it out! Allie is also amazing designer and has her own line of eco-concious wedding dresses. If you’re in the market for a truly elegant gown – or if you simply enjoy ogling beautiful clothes, like I do – head on over to the Little White Dress website and check out her lovely creations.

Maybe Allie is also a bit of a psychic, because her package included many of my favourite types of treats! Below is what awaited me when I opened my box…

FPPApril2

One of the Foodie Penpal requirements is that you included something handwritten in your package, and Allie penned me this sweet note to put in mine. It gives a little information on each of the items she sent as well as recommendations for other foods she likes and thought I’d also enjoy, like Yoso coconut yogurt and Silk dark chocolate almond milk. I’m keeping an eye out for these for sure!

FPPApril5

I love Vega products as they’re vegan and don’t contain the same creepy ingredients as other brands. I’ve never tried this flavour of smoothie but I’m down with anything containing berries so I’m sure I’ll like it. I’m hanging on to this until I’m in need of a serious pick-me-up!

FPPApril6

I’m passionate about dark chocolate, and this Giddy Yo Yo bar is the real deal. The chocolate was rich and silky with just a hint of vanilla and sea salt. Mind-bogglingly good! I definitely want to try out some of their other flavours.

FPPApril8

Good call on this one, Allie! I use nutmeg frequently in my cooking and baking but usually buy the pre-ground stuff. I’m sure these whole nutmeg pods taste far more fresh and flavourful. I can’t wait to try them! Cute packaging, too.

FPPApril7

I also received these two tasty  snacks. The Oskri Dark Chocolate Coconut Bar – basically a healthier version of a Mounds bar – has a pleasantly sweet, shredded coconut centre wrapped in a rich dark chocolate coating. I ate it for dessert the other night and loved every bite. The Canadian Maple Forest Bar was also delicious… dried fruit, nuts and brown rice crisps all held together with maple syrup and agave nectar. YUM!

FPPApril9

Aren’t these cute? Like dark chocolate I’m also passionate about coffee (and anything coffee flavoured), and obviously these latte candies fit the bill. I put these in my purse to stave off  cravings in the event that I can’t get to a coffee shop when the urge strikes.

FPPApril3

And now for the grand finale … a package of loose leaf tea from David’s Tea! The flavour is called ‘Read My Lips’ and it tastes like chocolate and mint! Typically I stick to traditional tea flavours so my taste buds were pretty much blown away by this tea.

FPPApril4

Now take a closer look… Amongst the black tea leaves are red lip sprinkles and mini chocolate chips! When hot water is poured over the tea the sprinkles and chocolate chips melt and impart the tea with a delicious chocolate and mint flavour! It smells fantastic and tastes even better.

That’s it for this month! Thanks again to Allie for sending me such a nicely assembled box of yummy stuff and for making my first Foodie Penpals experience a great one 🙂

To find out more about Foodie Pen Pals, or to sign up, visit the Lean Green Bean blog here.

{Vegan} Asparagus and Sweet Pea Fettuccine Alfredo | With White Wine and Lemon

Our new house is proving to be the gift that gives on giving in the faulty appliance department. It started with the archaic beast of a cathode ray tube TV we dragged in from the shed when we first moved in; our initial plan was to put this relic to use until we could retrieve our flat screen from the storage locker. Evidently the years it spent mouldering out back proved to be too much for this already obsolete goggle box, for upon plugging it into the wall it began scrolling itself (!?) through various static-y channels before going completely dark, presumably forever. As we aren’t avid enough fans of TV to attempt to trouble shoot and repair such an ancient piece of technology, the next day it was dispatched to the local waste disposal station along with the teal wall-to-wall carpet ripped up from the bedroom floor.

Fett1

I won’t reiterate the problems we were having with our screwy toilet and besides, a toilet doesn’t really count as an appliance. I will mention briefly that those issues seemed to have resolved themselves, something which has had a surprisingly significant impact on my personal quality of life index; being able to flush and be done with the matter is pretty awesome! The next piece of appliance drama came in the form of a humongous ball of fluff – possibly years worth (seriously, I could have made a throw pillow out of it ) – extracted from the lint trap in the dryer. That’s it. The real drama played itself out in my brain, where the fluff ball caught ablaze and burned the whole house down while we slept. Morbid thoughts! My inner neurotic always has a field day with potential hazards.

Fett2

The most recent appliance debacle occurred just a couple days ago and nearly toppled my plans to make this moreish pasta dish. In the midst of reheating some food in the oven I noticed a few wisps of smoke rising from behind the stove. This wasn’t merely ‘burning food’ smoke (which would have freaked me out enough), but the far more menacing, hot and plastically, ‘electrical component failure’ variety. I switched off the oven and started panicking a little – not like the time flames leapt into the air when I threw a bunch of kale into a skillet containing overheated olive oil, that was out-and-out hysterics – but panicking enough. Mike (an electrician by trade, hallelujah) was summoned from the front lawn and was able to quickly ID the problem (something with one of the connections in the wiring) and fix it – and in so doing put an end to sinister thoughts of preparing this dish in the microwave.

Fett3

Alas, I’m back with yet another cashew cream sauce recipe. I can’t help it – the stuff is just so versatile and delish I want to throw it into everything these days! There’s a fun little game I’ve been playing with Mike – I call it ‘vegan bombing’ and it involves feeding him vegan dishes and seeing if he’s able to discern the absence of eggs and dairy products. My cashew cream recipes, I’m proud to report, ALWAYS pass the test! What’s more, they don’t leave you with that depressing ‘I just consumed my weight in butter and cream’ feeling with which conventional cream sauces probably leave you. I don’t know about you, but white wine alfredo sauce totally makes me think of the 80s – you know, yuppies yucking it up on yachts, Hall and Oates, gigantic shoulder pads, stuff along those lines of cocaine – but I love it all the same! Combined with fresh asparagus, sweet green peas and lemon, it’s like a mouthful o’ Spring 🙂

What is your favourite way to cook asparagus? I’m always looking for new ideas!

Fett4

Recipe: Asparagus and Sweet Pea Fettuccine Alfredo | With White Wine and Lemon

Ingredients:

  • 1 cup plain cashews (+ water for soaking)
  • 225g fettuccine pasta (or your choice of gluten free pasta)
  • 3 cups vegetable broth (I used low sodium broth)
  • 2 tablespoons extra virgin olive oil
  • 2 tablespoons flour
  • 3 large garlic cloves, finely sliced
  • Pinch of red pepper flakes
  • 3/4 cup sweet green peas (thawed if using frozen)
  • 12 thin asparagus stalks, tough ends removed
  • 1/3 cup white wine (I used Pinot Blanc)
  • Zest of 1 medium lemon
  • Salt and freshly ground black pepper

Method:

1. Place cashews in a small bowl and cover with water. Let soak for an hour. Drain and rinse.

2. Place soaked cashews and vegetable broth in a blender or food processor. Blend for two minutes or until cashews and broth form a smooth liquid. Set aside.

3. Fill a medium skillet with cold water and bring to a gentle boil. Add asparagus and reduce to a simmer. Let asparagus cook just until bright green and tender crisp (this should only take a minute or two). Immediately drain asparagus and transfer to a bowl of ice water (this will ensure asparagus doesn’t over cook).

4. Once asparagus is cold, remove from water and cut into 1″ pieces. Set aside until needed.

5. Cook fettuccine according to package instructions, or until al dente. Drain and rinse. Set aside until needed.

6. Heat 2 tablespoons of olive oil in a large skillet over medium heat. Add garlic and red pepper flakes and saute just until garlic is golden brown.

7. Reduce heat slightly. Sprinkle flour into skillet and whisk continuously until a smooth paste forms.

8. Slowly pour cashew and broth mixture into skillet, whisking continuously until everything is incorporated and a smooth, creamy sauce forms.

9. Stir in wine and lemon zest. Taste sauce and season to taste with salt and pepper.

10. Fold in pasta, peas and asparagus.

11. Serve immediately, topping each portion with freshly ground black pepper. Eat!

You might also like:

Stuffed Baked Pears | With Oats, Figs and Honey

I have the most insatiable sweet tooth known to man. I’ve made this lofty claim previously but in the wake of Easter – which essentially amounted to an all out candy-eating gorge fest in my household – it bears repeating. Yes, it’s around the holidays that my tendency to overindulge in sugar really rears its insulin-spiking head. You might recall that huge Christmas cake of ill repute, the one I managed to polish off all by my lonesome, over the course of a few weeks, piece after piece stealthily snatched from the freezer. Well Easter witnessed similar petty crimes, except in this case my victims were a sickening number of chocolate bunnies and eggs.
Pears1
Really I have no problem munching on sweet treats over the holidays – it’s fun to be festive and depriving myself of food I enjoy puts me in a dark mood. The issue is that these holiday overindulgences tend to set me off on a rather unhealthy pattern of sugar consumption. Suddenly eating candy after dinner EVERY NIGHT doesn’t seem like too bad of an idea. An apple fritter with that Tim Horton’s coffee? Sure, why not? Pancakes for breakfast on a Wednesday? Oh hell ya! Before I know I’m back on the sugar wheel, consuming way too many sugary confections and always wanting more. Madness!
Pears2
So once again, I find myself having to do a self-intervention before I snack my way too far into diabetes territory. That being said, I’m not inclined to completely renounce my dessert habit – gotta keep a little junk in the trunk, right ladies? As such I’ve been searching for recipes that would provide a happy medium – that is, appease my sweet tooth without making feel like I’m ‘on a diet’ and eating like an ascetic monk. A tall order? Perhaps, but I knew that someone out there in the WordPress blogosphere or beyond must possess the answer to this culinary ruse!
Pears3
Sure enough, the universe answered my call. A couple of weeks ago I came across this recipe for baked apples on Nicole’s Cauldrons and Cupcakes blog. This is precisely the type of recipe I was after. It contains some seriously healthy ingredients – fruit, walnuts and dates – yet with some sort of sleight of hand tricks you into thinking you’re eating something quite sinful when really the opposite is true. Inspired by Nicole, and eyeing some nice ripe pears on my counter, I set about creating my own baked fruit dessert (or in my case, lunch; it was around noon when I made this). This is what I came up with, which essentially amounts to an inside out pear crumble. Old fashioned oats, dried figs, a dab of honey , pie spices and a little butter are combined, stuffed into a hollowed out pear and baked until fall-apart soft. Simply delicious. I think these baked pears have set me on the path toward better glycemic health – just do me a favour and call security if you see me approaching the ‘danger zone’ (AKA the bulk candy aisle) at the grocery store 🙂
Pears4
Recipe: Stuffed Baked Pears | With Oats, Figs and Honey
Makes 4 baked pears
Ingredients:
  • 4 ripe (but not mushy) pears – I used Bartletts
  • 1/2 cup old fashioned oats (use gluten free oats if you have a gluten sensitivity)
  • 1/3 cup chopped dried figs
  • 2 tablespoons butter (or vegan butter)
  • 1 tablespoon honey (or agave or maple syrup) + a little more to serve
  • 1/2 teaspoon cinnamon
  • Dash of nutmeg
  • 1/4 teaspoon sea salt (or less if using table salt)

Method:

1. Preheat oven to 350F.

2. Remove top 1/5th of each pear and set aside – these will be the ‘lids’ for your baked pears.

3. Using a small spoon or apple corer, scoop core from each pear, making sure not to cut through bottom of pear.

4. Place pears in an 8″ x 8″ baking pan and set aside.

5. In a small bowl stir together oats, figs, cinnamon, nutmeg and salt.

6. Add butter (or vegan butter) and honey (or agave or maple syrup) and mix well until everything is combined.

7. Press oat mixture firmly into pears and top with pear tops.

8. Fill bottom of pan with 1/2 cup of water.

9. Place pan in oven for 30-40 minutes, or until oat mixture is warm and soft.

10. Remove from oven and serve, topping each pear with a drizzle of honey (or agave or maple syrup). Optional: Pair with a scoop or two of ice cream or vegan ice cream.

You might also like:

Roasted Carrot, Ginger and Coconut Milk Soup

I’m really starting to get into this whole ‘living in a house’ thing – being able to walk two paces without tripping over or bumping into something or someone is a refreshing change. Previous to living in the RV I’d been a condo and apartment dweller for the better part of two decades, since I moved away from the parental nest at age 18. This span of time gave me plenty of experience in the art of making do with limited closet space (which always proved to be the ultimate first world problem for this clothes hoarder), living in close proximity to others (including cats and their littery, feathery, toy-mousey paraphernalia), and of course, cooking in very small kitchens – which I waxed on about ad naseum during those 7 sanity-testing months at the trailer park!
Carrot1
So yeah – I grew more than accustomed to confined interior living spaces. Those years of living in high rises also inured me to life without access to immediate outdoor space. Yes, there were public parks around where I lived at various points, and a couple places had a small patio (one of which accompanied a 26th-floor suite and was so high off the ground it caused vertigo if you dared look over the edge). But living above ground level as I did meant that having access to an actual yard just wasn’t on the menu. I didn’t mind too much at that point – convenient access to a million coffee shops, restaurants and places to shop was more of a priority. In my mind, yards were the mein of suburbanites – and goodness knows I wasn’t one of those!
Carrot2
It was only when we moved into the house – in the suburbs, the horror! – that I realized how out of touch I was with the notion of having a yard – an actual plot of grass that only we (and assorted neighbourhood wildlife and possibly the odd eccentric searching for cans) have access to. The first couple of weeks we were here I only went into the backyard for practical reasons – i.e. to pick up dog poop. Partially it was the rain, but the real issue was that I didn’t know what to do with all that space! I’m not making this up – it had been such a long time since I’d been privy to a backyard that at first all I could do was shuffle around uncertainly back there, ineffectually contemplating the dilapidated shed.
Carrot3
Over the last couple of weeks I’ve impressed myself. Determined to overcome my silly yard trepidation, I suited up in a pair of garden gloves and rubber boots, and armed with a spade and rake undertook the process of weeding the garden beds. Fifteen minute backyard sessions have gradually lengthened into one and two hour weed-pulling fests. Despite various squirrels giving me the stink eye, at moments I’ve even felt quite peaceful and meditative back there, ankle deep in dirt!
Carrot4
Earlier in the week as I gazed into the produce drawer in the fridge, I got to thinking, ‘I should grow some of these vegetable things myself’. For a time I was really into playing Farmville – it can’t be that much different, right? Who knows, maybe this time next year this blog will have done a 180 and feature dishes that use produce grown in my own backyard – more improbable things have happened (did I mention I have a baby and live in the suburbs?)! In the meantime, why not try this easy, vegan and super flavourful soup on for size? Yes, it’s STILL  soup weather here on the West Coast, where Spring showers continue unabated. This recipe features caramelized roasted carrots, spices, fresh ginger and smooth coconut milk was the ideal reward after all my labours out back, tilling the soil 🙂
Recipe: Roasted Carrot, Ginger and Coconut Milk Soup
Makes 4-6 servings
Ingredients:
  • 6 medium carrots, peeled
  • 4 tablespoons extra virgin olive oil, divided
  • 3 cloves of garlic, minced
  • 1 large shallot, diced
  • 1 tablespoon minced fresh ginger
  • Pinch of red pepper flakes
  • 1/4 teaspoon cinnamon
  • 1/2 teaspoon paprika
  • 1 teaspoon coriander
  • 4 cups vegetable stock
  • 1 cup light coconut milk
  • 2 green onions, chopped (optional for garnish)
  • Salt and freshly ground black pepper

Method:

1. Preheat oven to 425F. Place carrots in an oven-proof dish and toss with 2 tablespoons of olive oil. Season lightly with salt and pepper. Place in oven for 20-30 minutes – turning carrots over half way through – or until carrots are tender and caramelized. Remove from oven and set aside to cool.

2. In a large saucepan heat 2 tablespoons of olive oil. Add shallots and saute until soft and translucent.

3. Add garlic and ginger and saute just until golden brown.

4. Add red pepper flakes, cinnamon, paprika and coriander and stir until spices coat other ingredients.

5. Add vegetable stock and bring to a gentle boil. Reduce to a simmer.

6. Once carrots are cool enough to handle, chop into smallish pieces, discarding of ends. Add to saucepan.

7. Let soup simmer partially covered for 15-20 minutes.

8. Using an immersion blender, puree until soup is smooth. Alternately you can transfer soup to a conventional blender to puree, then return soup to saucepan.

9. Add coconut milk and stir to warm through. Taste and season with salt and pepper.

10. Serve, topping each portion with chopped green onions. Eat!

You might also like:

Springtime French Green Lentil and Pearl Barley Soup

In my last post I detailed a few of the nefarious finds we’ve made at our new house: the elaborate spider’s nest in the wall, the sketchy crow bar marks on the front door, the kitschy linoleum underlying the lurid teal carpet in the bedroom, both of which are now on their way to the municipal waste station. The weirdness of this flooring situation didn’t hit me until last night. Why was there linoleum in the bedroom to begin with – was that a thing in the late 1960s? And was covering it with teal carpet really the best solution? Oh well, there’s no accounting for taste. That being said, the creative mind responsible for said carpet would likely be equally offended by my design sense .

French1

It’s not my intention to sound like a big old squeaky wheel about the house – believe me, I am more than relieved to be out of the RV even if it means dodging the odd Black Widow and seeing various shades of teal wherever I look. But there’s one last undesirable feature of the house I’d like to mention. The toilet. Yes, I bring up toilets way too often on this blog. But it’s worth mention that, in a cruel twist of fate – after 7 1/2 months of persevering with the clog-prone septic system in the RV – the toilet in the house is… well, I’ll be nice and say it has personality. Indeed, it makes disturbing gurgling sounds, its water surges threatening toward the rim, it flushes ‘normally’ only if you hold the lever down just so. I’m starting to think I must have been an incompetent plumber in a previous life, and am paying my due now via a series of faulty toilets.

French2

The house has also coughed up some pretty cool booty (as in stuff, not the other kind). My SO has actually owned this house for several years, but was renting it to his sister until we moved in last month. Evidently he’d used the cupboards in the laundry room as a dumping ground for miscellaneous junk before he moved out years ago, because when I went to clean out said cupboards I unearthed – amongst several pieces of ancient Tupperware – an ice cream maker straight from the 1980s (remember when these were all the rage?), an unused wok (score) and bafflingly, a single leather glove – which made me wonder if I had a piece of forensic evidence on my hands.

French3

Over the weekend we had a very welcome spate of warm, dry weather here in the Lower Mainland ,which prompted everyone to simultaneously shed their fleece and Gore-Tex and flee into the out-of-doors. This week, however, the Spring showers returned, putting me back in the mood for warm food. The seasonal ingredients that are beginning to make an appearance in grocery stores inspired me to whip up this easy springtime soup featuring French green lentils, pearl barley, sweet carrots, shallots, leeks, white mushrooms, spring onions, lemon and fresh basil! Apart from asparagus (which I’ve yet to come across unfortunately), nothing heralds the arrival of Spring like lemon and fresh herbs 🙂

French4

Recipe: Springtime French Green Lentil and Pearl Barley Soup

Makes 4-6 servings

Ingredients:

  • 1/2 cup french green lentils, uncooked
  • 1/4 cup pearl barley, uncooked (omit or substitute lentils if you’re GF)
  • 2 tablespoons of extra virgin olive oil
  • Pinch of red pepper flakes
  • 1/2 teaspoon paprika
  • 1 medium shallot, finely chopped
  • 1 medium leek, finely chopped (white and light green parts only)
  • 2 large garlic cloves, finely sliced
  • 2 small carrots, diced into 1/4″ thick medallions
  • 1 small zucchini, diced
  • 5 cups vegetable stock (I used low sodium)
  • 2 green onions, chopped (dark and light green parts only), plus a bit more for garnish
  • 4-5 leaves of fresh basil, chopped
  • Juice and zest of 1/2 lemon
  • Salt and freshly ground black pepper

Method:

1. Place dried lentils and barley in a medium saucepan and cover with water. Cover saucepan and bring to a boil. Reduce heat to a simmer and let cook for 20-30 minutes or until lentils and barley are tender, but still firm. Drain and rinse under cold water. Set aside until needed.

2. In a large saucepan heat 2 tablespoons of olive oil. Add shallots, leeks and carrots and saute until tender.

3. Add in garlic, red pepper flakes and paprika and stir just until garlic is golden brown.

3. Add in cooked lentils, barley and zucchini and stir until everything is combined.

4. Add vegetable stock and bring to a gentle boil.

5. Reduce heat to a simmer and let cook until zucchini is tender (or preferably longer to let flavours develop). Taste and season with salt and pepper.

6. Just before serving, stir in lemon juice, green onions, and basil.

7. Serve, topping each portions with chopped green onions and lemon zest. Eat!

You might also like: